1. Installing Output Messenger Server
- Download Output Messenger Server in downloads page.
- Save the installation file to your desktop.
- Right-click the installation file (outputmessengerServersetup.exe) and select Run as administrator.
- Follow the instructions to install Server.
- Click Finish when you are done.
(You can either log in Server Manager tool or configure the needed firewall/router settings as below)
Installation Video
1a. Firewall Configuration
If you are using Windows Firewall:
By default, installer will add Output Messenger Server Service OMServerService.exe (located in the installed folder) in Windows Firewall Allowed Applications.
You can verify by following steps :
- In Windows Control Panel, > click Windows Firewall.
- In the left pane, click Allow a program or feature through Windows Firewall.
- You can find “Output Messenger Server” & it is enabled.

- If not, click Change settings, then click Allow another app…
- Browse to Output Messenger Server installed folder (default C:\Program Files (x86)\Output Messenger Server) & select OMServerService.exe.
- Make sure Private network type is selected & select Public if you want to allow communication on that network, and then click OK.
Note: Adding application in Windows firewall exception listis recommended & no need to open any port in Windows Firewall for Output Messenger.. If you are using any other Firewall, based on its configuration, you can add “OMServerService.exe” in the application exception list. For Port-based firewall, open the needed ports mentioned below in the router configuration.
1b. Router Configuration (optional)
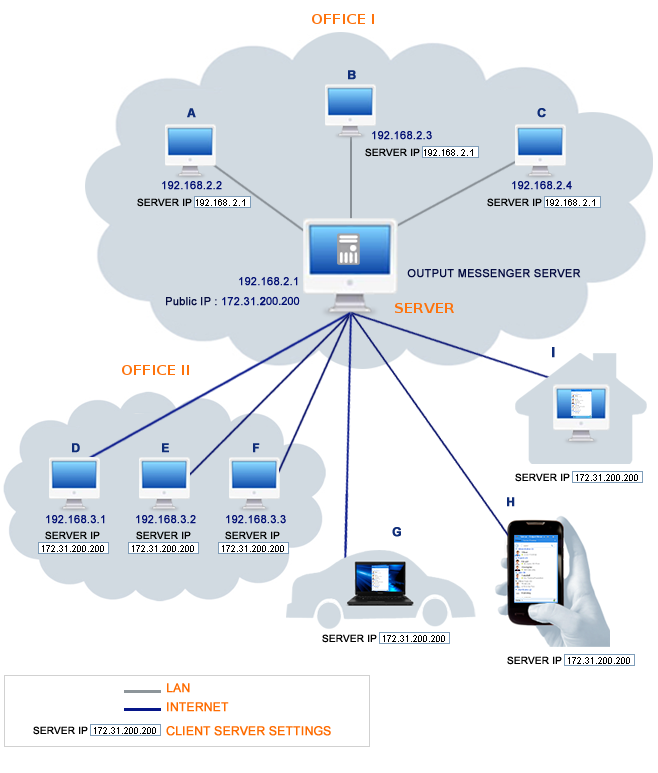
A router needs to be configured if you want to allow external Output Messenger clients to connect with Output Messenger Server.
- Router Firewall (open Ports)
Make sure the following ports using by output messenger server are opened in the router firewall:
14121 TCP – Application
14122 TCP – File Transfer
14123 TCP – Web server for Browser Version
14124 TCP & UDP – VoIP for Voice/Video/Desktop Sharing
14125 TCP – API Access
2195 TCP – IOS Push Notification - Port Forwarding / NAT
In Router, forward the above-mentioned ports to the IP Address of the host where Output Messenger Server is running.
That’s done. Now you can start configuring Output Messenger Server using Server Manager tool.
2. Database Configuration
Output Messenger Server can store the data in any of the following databases.
- SQLite (Default)
- MS SQL Server
- MySQL Server
2a. SQLite
By default, SQLite Database will be used. No configuration needed for this database file.
The database file OMLs.db3 will be generated in the Server installed folder.
To back up SQLite database file:
Stop the server service & copy the file to your backup location.
To Restore:
Stop the server service & replace the file with your backup file.
2b. MSSQL / MySQL Server
To select the other database options, in Server Manager > Configuration > click “Switch Database” Link:
 To use MySQL or MS SQL Server, create a database for Output Messenger in Server & provide the Server, Database & Login Details.
Output Messenger Server will create the needed tables in the provided database at run time.
Note:
- While switching database from SQlite to MS SQL or MY SQL (if new db), any existing data from the old database can be migrated (if it is a fresh database). You can either choose yes or no for data migration.
- All User Passwords are stored in the database table by applying hash algorithm.
- The chat log history will not be stored in database. Logs will be stored in a file format at the specified folder in Configuration.
3. Enabling Active Directory Integration
To synchronize Active Directory (LDAP) user accounts with Output Messenger Server user account, in Server Manager > Configuration and enable the Integrate Active Directory Authentication option & provide the LDAP Hostname.
 By enabling this option, users can sign in to Output Messenger by using their AD(Active Directory) User Accounts.
For multiple LDAP servers, use a comma-separated list of the host in LDAP Hostname. (Ex. server1.company.com;server2.company.com)
3a. How it works ?
When a client logs in to Output Messenger, his/her login credentials will be validated with the Output Messenger server local database.
Case 1:
If his/her log-in details were not matched and the “Integrate Active Directory” option is enabled in the Output messenger server, the following will happen.
Output messenger server will connect with the specified Active Directory host & validate the credentials of the user who attempted to log in.
Case 2:
If his/her log-in details were matched, then the client details will be imported to the Output messenger server local database. And the client will get authorized.
The AD User Password will not be stored in Output messenger local database. All the other details of the AD user will be saved.
So, on each log-in, the user credentials will be validated with AD.
3b. Manual Import of AD Users
Other than on-fly import of AD user on login, we can also manually import all AD users to local database, for grouping purpose.

Step 1: In Server Manager, Choose File > User Import and Export. The User Import Export window opens.
Step 2: Select “Import Users from Microsoft Active Directory” and Click Next.
Step 3: Provide LDAP Hostname.
Step 4: Select Current User Option, if your account has appropriate permissions to connect to the AD & import users OR select the Specified Account option, provide the login details of the user account who has enough permission.
Step 5: Click Next. You will be listed the AD users to select for import.
Step 6: Select the needed users & click “Import“.
3c. Grouping LDAP Users
By default, the imported AD users will be stored under the Group matching their department name. We can also update the group of the user manually by editing the user.
4. Output Messenger Client Installation(Windows OS)
System Requirements:
- Install Output Messenger Client in any of these Windows System (Windows Vista, Server 2003, 2008, 7, 8).
- Minimum hardware requirements: Processor: 1 GHz RAM: 1 GB Disk Space: 2 GB
- Client application requires .NET Framework 4.0 to be installed. If not, the installer will download automatically from the website.To install manually, you can download .NET framework from www.microsoft.com/en-us/download/details.aspx?id=17718
4a. Steps for Client Installation
- Download Output Messenger Client in downloads page.
- Save the installation file to your desktop.
- Right-click the installation file (outputmessengersetup.exe) and select Run as administrator.
To install under group policy, download & use MSI installer of client.
Note: To set Server IP Address default in the client, you can pass the Server IP Address/hostname as a command line argument of the installers.
Ex 1: outputmessengersetup.exe server=192.168.1.1 – EXE Installer
Ex 2: outputmessengersetup.msi server=192.168.1.1 – MSI Installer - Follow the instructions to install client.
- Click Finish when you are done.
4b. Firewall Configuration
If you are using Windows Firewall:
By default, installer will add OutputMessenger.exe (located in the installed folder) in Windows Firewall Allowed Applications.
You can verify by following steps :
- In Windows Control Panel, > Click Windows Firewall.
- In the Left Panel, Click Allow a program or feature through Windows Firewall.
- You can find “Output Messenger” & it is enabled.


- If not, Click Change settings, then Click Allow another app…
- Browse to Output Messenger installed folder (default C:\Program Files (x86)\Output Messenger) & select OutputMessenger.exe.
- Make sure Private network type is selected & select Public if you want to allow communication on that network, and then Click OK.

Note: Adding application in Windows firewall exception list is recommended & no need to open any port in Windows Firewall for Output Messenger.
If you are using any other Firewall, based on its configuration, you can add OutputMessenger.exe in the application exception list.
4c. Output Messenger First Run
- On starting Output Messenger, you will be getting Server IP / Domain input screen.
- Provide the Output Messenger Server running host’s name or IP Address. Click Continue.
- Login using the user account details created in server using Server Manager tool.
- On successful login, you will be displayed the Users List.
4d. Output Messenger Client MSI Installer
Click here for MSI installation.
5. Output Messenger Client Installation(MSI Installer, Mac/Ubuntu OS, Android, iOS & web browser)
- Mac/Ubuntu (Desktop User):Application developed in Electron & Js. Mac OS support version is X10.7.3 or later. Ubuntu OS support version is 16.04 or later. User settings, information and chat logs are stored In SQLite DB.
For more details on Mac installation: Click hereFor more details on Ubuntu installation: Click here - Android & IOS:
Native apps can be downloaded from Play Store / App Store. Supports push notifications. For more details on Android app installation: click here. For more details on iOS app installation: click here. - Web Browser
Optional. Need to enable Browser version in Server Manager. Also enable SSL and can apply your own certificate. Chrome/Firefox supported. For more details,click here.